整理 RabbitMQ 生产者确认、消费者确认、重试机制,以及死信队列和延迟插件两类延迟消息方案。
本篇要点
- 分开看生产者、Broker 和消费者确认
- 了解发送失败后的重试
- 比较死信队列与延迟插件
**学习提示:**本篇是 RabbitMQ 机制笔记;项目实际的订单超时取消方案要以对应代码为准,消息可靠性也不等于“绝不丢失、绝不重复”。
RabbitMQ使用
1、消息可靠性配置
1.1、介绍
MQ消息的可靠性,一般需要三个方面一起保证:
- 生产者不丢数据
- MQ服务器不丢数据
- 消费者不丢数据
保证消息不丢失有两种实现方式:
**说明:**开启事务会大幅降低消息发送及接收效率,使用的相对较少,因此我们生产环境一般都采取消息确认模式,以下我们只是讲解消息确认模式
1.2、消息发送确认配置
消息发送确认可以保证生产者不丢数据
封装发送端消息确认配置类
1
2
3
4
5
6
7
8
9
10
11
12
13
14
15
16
17
18
19
20
21
22
23
24
25
26
27
28
29
30
31
32
33
34
35
36
37
38
39
40
41
42
43
| @Slf4j
@Component
public class RabbitInitConfigApplicationListener implements ApplicationListener<ApplicationReadyEvent> {
@Autowired
private RabbitTemplate rabbitTemplate;
@Override
public void onApplicationEvent(ApplicationReadyEvent event) {
this.setupCallbacks();
}
private void setupCallbacks() {
this.rabbitTemplate.setConfirmCallback((correlationData, ack, reason) -> {
if (ack) {
log.info("消息发送到Exchange成功:{}", correlationData);
} else {
log.error("消息发送到Exchange失败:{}", reason);
}
});
this.rabbitTemplate.setReturnsCallback(returned -> {
log.error("Returned: " + returned.getMessage() + "\nreplyCode: " + returned.getReplyCode()
+ "\nreplyText: " + returned.getReplyText() + "\nexchange/rk: "
+ returned.getExchange() + "/" + returned.getRoutingKey());
});
}
}
|
修改配置
1
2
3
4
5
6
7
8
9
10
11
12
| spring:
rabbitmq:
host: 127.0.0.1
port: 5672
username: guest
password: <RABBITMQ_PASSWORD>
publisher-confirm-type: CORRELATED
publisher-returns: true
listener:
simple:
cknowledge-mode: manual
prefetch: 1
|
1
2
| 轮询分发:任务平均分配。不管谁忙,都不会多给消息,总是你一个我一个
公平分发:能者多劳。谁消费得快,谁就消费得多。
|
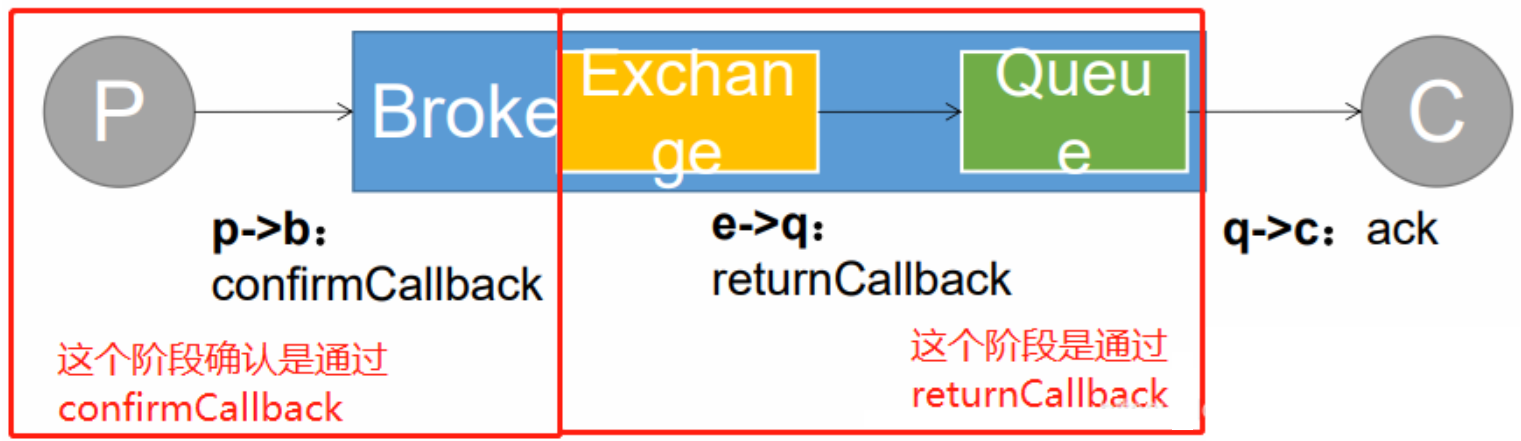
监听确认消息
1
2
3
4
5
6
7
8
9
10
11
12
13
14
15
|
@SneakyThrows
@RabbitListener(bindings = @QueueBinding(
exchange = @Exchange(value = MqConst.EXCHANGE_TEST, durable = "true"),
value = @Queue(value = MqConst.QUEUE_CONFIRM, durable = "true"),
key = MqConst.ROUTING_CONFIRM
))
public void confirm(String content, Message message, Channel channel) {
channel.basicAck(message.getMessageProperties().getDeliveryTag(), false);
}
|
1.3、消息发送失败,设置重发机制
实现思路:借助redis来实现重发机制
GmallCorrelationData
自定义一个实体类来接收消息
1
2
3
4
5
6
7
8
9
10
11
12
13
14
15
16
| @Data
public class GuiguCorrelationData extends CorrelationData {
private Object message;
private String exchange;
private String routingKey;
private int retryCount = 0;
private boolean isDelay = false;
private int delayTime = 10;
}
|
RabbitService
修改发送方法
1
2
3
4
5
6
7
8
9
10
11
12
13
14
15
16
17
18
19
20
21
22
23
24
25
26
| @Autowired
private RedisTemplate redisTemplate;
public boolean sendMessage(String exchange, String routingKey, Object message) {
GuiguCorrelationData correlationData = new GuiguCorrelationData();
String uuid = "mq:" + UUID.randomUUID().toString().replaceAll("-", "");
correlationData.setId(uuid);
correlationData.setMessage(message);
correlationData.setExchange(exchange);
correlationData.setRoutingKey(routingKey);
redisTemplate.opsForValue().set(uuid, JSON.toJSONString(correlationData), 10, TimeUnit.MINUTES);
rabbitTemplate.convertAndSend(exchange, routingKey, message, correlationData);
return true;
}
|
RabbitInitConfigApplicationListener
修改RabbitInitConfigApplicationListener类
1
2
3
4
5
6
7
8
9
10
11
12
13
14
15
16
17
18
19
20
21
22
23
24
25
26
27
28
29
30
31
32
33
34
35
36
37
38
39
40
41
42
43
44
45
46
47
48
49
50
51
52
53
54
55
56
57
58
59
60
61
62
63
64
65
66
67
68
69
70
71
72
73
74
75
76
77
78
79
80
81
| @Slf4j
@Component
public class RabbitInitConfigApplicationListener implements ApplicationListener<ApplicationReadyEvent> {
@Autowired
private RabbitTemplate rabbitTemplate;
@Autowired
private RedisTemplate redisTemplate;
@Override
public void onApplicationEvent(ApplicationReadyEvent event) {
this.setupCallbacks();
}
private void setupCallbacks() {
this.rabbitTemplate.setConfirmCallback((correlationData, ack, reason) -> {
if (ack) {
log.info("消息发送到Exchange成功:{}", correlationData);
} else {
log.error("消息发送到Exchange失败:{}", reason);
this.retrySendMsg(correlationData);
}
});
this.rabbitTemplate.setReturnsCallback(returned -> {
log.error("Returned: " + returned.getMessage() + "\nreplyCode: " + returned.getReplyCode()
+ "\nreplyText: " + returned.getReplyText() + "\nexchange/rk: "
+ returned.getExchange() + "/" + returned.getRoutingKey());
String redisKey = returned.getMessage().getMessageProperties().getHeader("spring_returned_message_correlation");
String correlationDataStr = (String) redisTemplate.opsForValue().get(redisKey);
GuiguCorrelationData guiguCorrelationData = JSON.parseObject(correlationDataStr, GuiguCorrelationData.class);
this.retrySendMsg(guiguCorrelationData);
});
}
private void retrySendMsg(CorrelationData correlationData) {
GuiguCorrelationData gmallCorrelationData = (GuiguCorrelationData) correlationData;
int retryCount = gmallCorrelationData.getRetryCount();
if (retryCount >= 3) {
log.error("生产者超过最大重试次数,将失败的消息存入数据库用人工处理;给管理员发送邮件;给管理员发送短信;");
return;
}
rabbitTemplate.convertAndSend(gmallCorrelationData.getExchange(), gmallCorrelationData.getRoutingKey(), gmallCorrelationData.getMessage(), gmallCorrelationData);
retryCount += 1;
gmallCorrelationData.setRetryCount(retryCount);
redisTemplate.opsForValue().set(gmallCorrelationData.getId(), JSON.toJSONString(gmallCorrelationData), 10, TimeUnit.MINUTES);
log.info("进行消息重发!");
}
}
|
2、延迟消息
延迟消息:生产者发送消息时指定一个时间,消费者不会立刻收到消息,而是在指定时间后才收到消息。
延迟消息有三种实现方案:
1,基于死信队列
2,集成延迟插件
3,使用Redisson框架
2.1、基于死信实现延迟消息
使用RabbitMQ来实现延迟消息必须先了解RabbitMQ的两个概念:消息的TTL和死信Exchange,通过这两者的组合来实现延迟队列
1、消息的TTL(Time To Live)
消息的TTL就是消息的存活时间。RabbitMQ可以对队列和消息分别设置TTL。对队列设置就是队列没有消费者连着的保留时间,也可以对每一个单独的消息做单独的设置。超过了这个时间,我们认为这个消息就死了,称之为死信。
如何设置TTL:
我们创建一个队列queue.temp,在Arguments 中添加x-message-ttl 为5000 (单位是毫秒),那所有压在这个队列的消息在5秒后会消失。
2、死信交换机 Dead Letter Exchanges
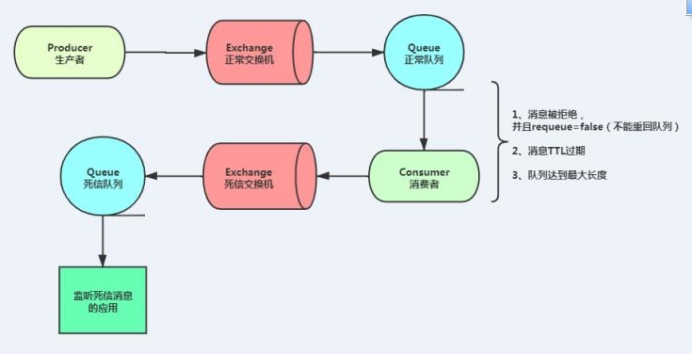
一个消息在满足如下条件下,会进死信路由,记住这里是路由而不是队列,一个路由可以对应很多队列。
(1) 一个消息被Consumer拒收了,并且reject方法的参数里requeue是false。也就是说不会被再次放在队列里,被其他消费者使用。
(2)上面的消息的TTL到了,消息过期了。
(3)队列的长度限制满了。排在前面的消息会被丢弃或者扔到死信路由上。
Dead Letter Exchange其实就是一种普通的exchange,和创建其他exchange没有两样。只是在某一个设置Dead Letter Exchange的队列中有消息过期了,会自动触发消息的转发,发送到Dead Letter Exchange中去。
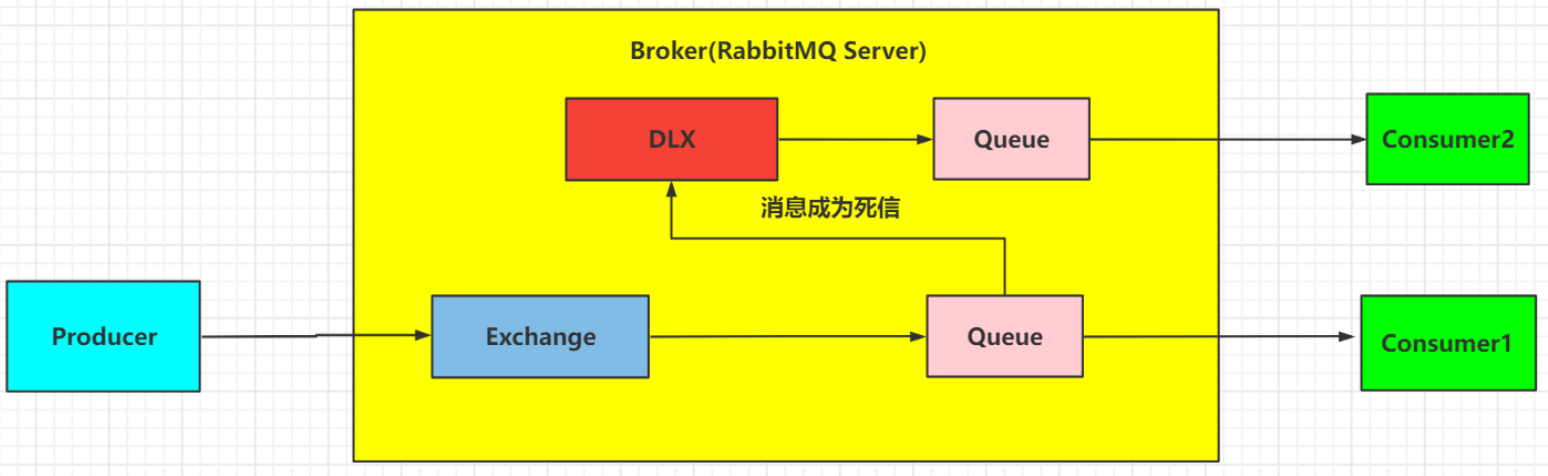
我们现在可以测试一下延迟队列。
(1)创建死信队列
(2)创建交换机
(3)建立交换器与队列之间的绑定
(4)创建队列
3、代码实现
DeadLetterMqConfig
1
2
3
4
5
6
7
8
9
10
11
12
13
14
15
16
17
18
19
20
21
22
23
24
25
26
27
28
29
30
31
32
33
34
35
36
37
38
39
40
41
42
43
44
45
46
47
48
| @Configuration
public class DeadLetterMqConfig {
public static final String exchange_dead = "exchange.dead";
public static final String routing_dead_1 = "routing.dead.1";
public static final String routing_dead_2 = "routing.dead.2";
public static final String queue_dead_1 = "queue.dead.1";
public static final String queue_dead_2 = "queue.dead.2";
@Bean
public DirectExchange exchange() {
return new DirectExchange(exchange_dead, true, false, null);
}
@Bean
public Queue queue1() {
HashMap<String, Object> map = new HashMap<>();
map.put("x-dead-letter-exchange", exchange_dead);
map.put("x-dead-letter-routing-key", routing_dead_2);
map.put("x-message-ttl", 10 * 1000);
return new Queue(queue_dead_1, true, false, false, map);
}
@Bean
public Binding binding() {
return BindingBuilder.bind(queue1()).to(exchange()).with(routing_dead_1);
}
@Bean
public Queue queue2() {
return new Queue(queue_dead_2, true, false, false, null);
}
@Bean
public Binding binding2() {
return BindingBuilder.bind(queue2()).to(exchange()).with(routing_dead_2);
}
}
|
MqController
1
2
3
4
5
6
7
8
9
|
@Operation(summary = "发送延迟消息:基于死信实现")
@GetMapping("/sendDeadLetterMsg")
public AjaxResult sendDeadLetterMsg() {
rabbitService.sendMessage(DeadLetterMqConfig.exchange_dead, DeadLetterMqConfig.routing_dead_1, "我是延迟消息");
return success();
}
|
TestReceiver
接收消息
1
2
3
4
5
6
7
8
9
10
11
12
|
@SneakyThrows
@RabbitListener(queues = {DeadLetterMqConfig.queue_dead_2})
public void getDeadLetterMsg(String msg, Message message, Channel channel) {
log.info("死信消费者:{}", msg);
channel.basicAck(message.getMessageProperties().getDeliveryTag(), false);
}
|
2.2、基于延迟插件实现延迟消息
Rabbitmq实现了一个插件x-delay-message来实现延时队列
1、插件安装
2、代码实现
DelayedMqConfig
1
2
3
4
5
6
7
8
9
10
11
12
13
14
15
16
17
18
19
20
21
22
23
24
25
| @Configuration
public class DelayedMqConfig {
public static final String exchange_delay = "exchange.delay";
public static final String routing_delay = "routing.delay";
public static final String queue_delay_1 = "queue.delay.1";
@Bean
public Queue delayQeue1() {
return new Queue(queue_delay_1, true);
}
@Bean
public CustomExchange delayExchange() {
Map<String, Object> args = new HashMap<String, Object>();
args.put("x-delayed-type", "direct");
return new CustomExchange(exchange_delay, "x-delayed-message", true, false, args);
}
@Bean
public Binding delayBbinding1() {
return BindingBuilder.bind(delayQeue1()).to(delayExchange()).with(routing_delay).noargs();
}
}
|
MqController
1
2
3
4
5
6
7
8
| @Operation(summary = "发送延迟消息:基于延迟插件")
@GetMapping("/sendDelayMsg")
public AjaxResult sendDelayMsg() {
int delayTime = 10;
rabbitService.sendDealyMessage(DelayedMqConfig.exchange_delay, DelayedMqConfig.routing_delay, "我是延迟消息", delayTime);
return success();
}
|
RabbitService
封装到工具类模块
1
2
3
4
5
6
7
8
9
10
11
12
13
14
15
16
17
18
19
20
21
22
23
24
25
26
27
28
29
|
public boolean sendDealyMessage(String exchange, String routingKey, Object message, int delayTime) {
GuiguCorrelationData correlationData = new GuiguCorrelationData();
String uuid = "mq:" + UUID.randomUUID().toString().replaceAll("-", "");
correlationData.setId(uuid);
correlationData.setMessage(message);
correlationData.setExchange(exchange);
correlationData.setRoutingKey(routingKey);
correlationData.setDelay(true);
correlationData.setDelayTime(delayTime);
rabbitTemplate.convertAndSend(exchange, routingKey, message,message1 -> {
message1.getMessageProperties().setDelay(delayTime*1000);
return message1;
}, correlationData);
redisTemplate.opsForValue().set(uuid, JSON.toJSONString(correlationData), 10, TimeUnit.MINUTES);
return true;
}
|
3、消费者端幂等性处理
消费结果会发送多次,也被消费多次!
如何保证消息幂等性?
- 使用数据库方式
- 使用redis setnx 命令解决(推荐)
1
2
3
4
5
6
7
8
9
10
11
12
13
14
15
|
@SneakyThrows
@RabbitListener(queues = {DeadLetterMqConfig.queue_dead_2})
public void getDeadLetterMsg(String msg, Message message, Channel channel) {
String key = "mq:" + msg;
Boolean flag = redisTemplate.opsForValue().setIfAbsent(key, "", 200, TimeUnit.SECONDS);
if (!flag) {
return;
}
channel.basicAck(message.getMessageProperties().getDeliveryTag(), false);
}
|
2.3、Redisson实现
在订单方法发送延迟消息到队列
1
2
3
4
5
6
7
8
9
10
11
12
13
|
public void sendDelayMessage(Long id) {
RBlockingQueue<Object> blockingQueue =
redissonClient.getBlockingQueue(MqConst.EXCHANGE_CANCEL_ORDER);
RDelayedQueue<Object> delayedQueue = redissonClient.getDelayedQueue(blockingQueue);
delayedQueue.offer(id.toString(),10,TimeUnit.SECONDS);
}
|
接收端,从队列获取延迟消息
1
2
3
4
5
6
7
8
9
10
11
12
13
14
15
16
17
18
19
20
21
22
23
24
25
26
27
28
29
30
31
32
33
| @Component
public class RedisDelayHandle {
@Autowired
private RedissonClient redissonClient;
@Autowired
private OrderInfoService orderInfoService;
@PostConstruct
public void listener() {
new Thread(()->{
while(true) {
try {
RBlockingQueue<String> blockingQueue =
redissonClient.getBlockingQueue(MqConst.EXCHANGE_CANCEL_ORDER);
String id = blockingQueue.take();
if(StringUtils.hasText(id)) {
orderInfoService.orderCancel(Long.parseLong(id));
}
} catch (InterruptedException e) {
throw new RuntimeException(e);
}
}
}).start();
}
}
|
1
2
3
4
5
6
7
8
9
|
@Override
public void orderCancel(long orderId) {
OrderInfo orderInfo = orderInfoMapper.selectById(orderId);
if(orderInfo.getOrderStatus().equals("0901")) {
orderInfo.setOrderStatus(SystemConstant.ORDER_STATUS_CANCEL);
orderInfoMapper.updateById(orderInfo);
}
}
|