梳理微信小程序登录、OpenID 查询、Redis 保存登录态,以及自定义注解和 AOP 校验登录的流程。
本篇要点
- 从 code 获取用户身份
- 用 Redis 保存登录状态
- 通过注解与切面统一校验登录
内容回顾
核心模块
声音管理模块
今天内容
前置知识
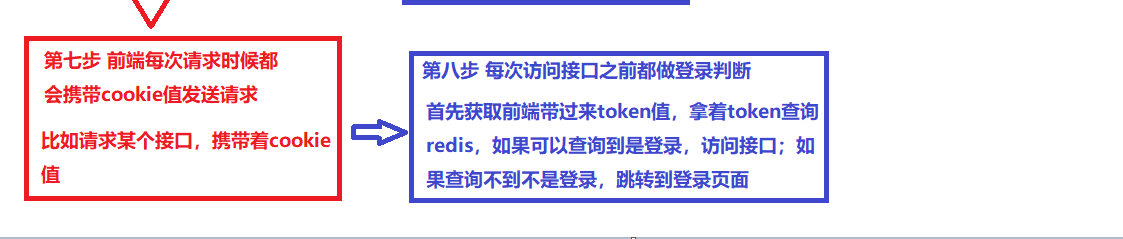
1、用户登录流程(背)
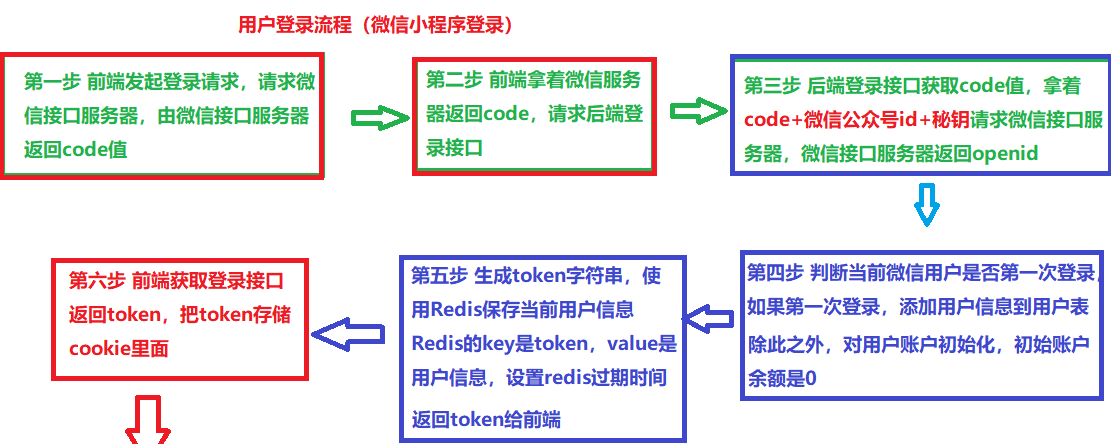
- **httpClient:**请求微信接口服务器使用httpClient
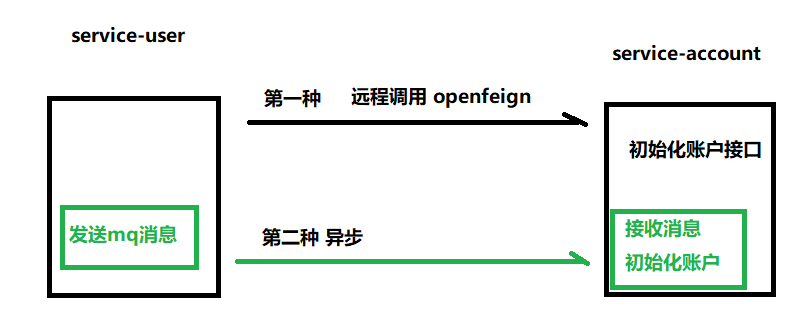
- **RabbitMQ:**第一次登录,使用RabbitMQ异步初始化账户余额
- **Redis:**通过Redis存储token数据,Redis的key是token,value是用户信息,设置过期时间
- **Cookie(localStorage):**因为cookie默认不能跨域传递的,每次发送请求时候,把cookie值放到请求头里面进行传递
- 自定义注解
- AOP
2、实现校验登录
流程
- 每次请求接口都需要首先做登录判断
- 1、从请求头获取token(前端传递过来的)
- 2、根据token查询redis(redis的key是token),如果可以查询到是登录,查询不到不是登录
基础代码实现
1
2
3
4
5
6
7
8
9
10
11
|
String token = request.getHeader("token");
if(StringUtils.isEmpty(token)) {
throw new GuiguException(ResultCodeEnum.LOGIN_AUTH);
}
UserInfo userInfo = (UserInfo)redisTemplate.opsForValue().get(token);
if(userInfo == null) {
throw new GuiguException(ResultCodeEnum.LOGIN_AUTH);
}
|
最终实现
分析过程
- 上面代码虽然可以实现实现登录校验,但是每个接口方法里面都需要写上面重复代码
- 实现方式有很多种
第一种 使用Spring里面拦截器实现
第二种 使用Gateway网关里面过滤器实现
第三种 使用自定义注解 + AOP实现
实现步骤
第一步 创建注解,创建相关属性
1
2
3
4
5
6
7
8
9
10
11
12
13
14
15
|
@Target({ElementType.METHOD})
@Retention(RetentionPolicy.RUNTIME)
public @interface GuiguLogin {
boolean required() default true;
}
|
第二步 创建切面类
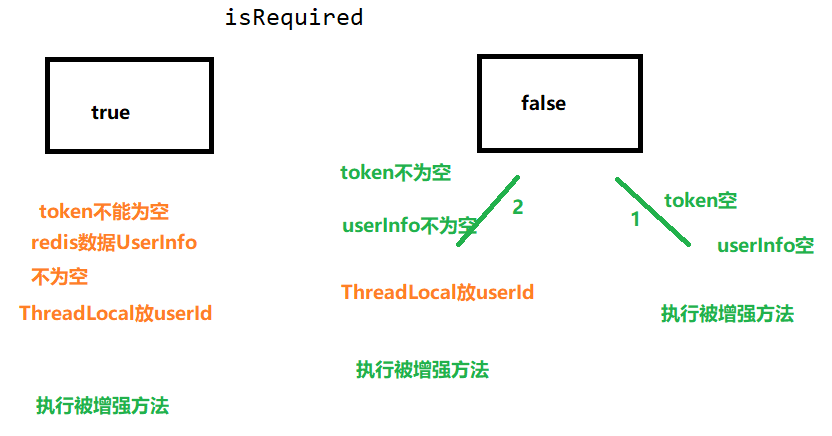
在切面类里面,创建方法,方法里面写登录校验逻辑
在方法上面添加注解,使用通知(环绕)
1
2
3
4
5
6
7
8
9
10
11
12
13
14
15
16
17
18
19
20
21
22
23
24
25
26
27
28
29
30
31
32
33
34
35
36
37
38
39
40
41
42
43
44
45
46
47
48
49
50
51
52
53
54
| @Aspect
@Component
public class GuiGuLoginAspect {
@Autowired
private RedisTemplate redisTemplate;
@Around("execution(* com.atguigu.tingshu.*.api.*.*(..)) && @annotation(guiguLogin)")
public Object login(ProceedingJoinPoint joinPoint,
GuiguLogin guiguLogin) throws Throwable {
RequestAttributes requestAttributes = RequestContextHolder.getRequestAttributes();
ServletRequestAttributes attributes = (ServletRequestAttributes) requestAttributes;
HttpServletRequest request = attributes.getRequest();
String token = request.getHeader("token");
boolean isRequired = guiguLogin.required();
if(isRequired) {
if(StringUtils.isEmpty(token)) {
throw new GuiguException(ResultCodeEnum.LOGIN_AUTH);
}
UserInfo userInfo = (UserInfo) redisTemplate.opsForValue().get(token);
if(userInfo == null) {
throw new GuiguException(ResultCodeEnum.LOGIN_AUTH);
}
}
if (!StringUtils.isEmpty(token)){
String loginKey = RedisConstant.USER_LOGIN_KEY_PREFIX+token;
UserInfo userInfo = (UserInfo) this.redisTemplate.opsForValue().get(loginKey);
if (null != userInfo){
AuthContextHolder.setUserId(userInfo.getId());
}
}
Object obj = joinPoint.proceed();
return obj;
}
}
|
第三步 在具体接口上面,添加注解,实现登录校验
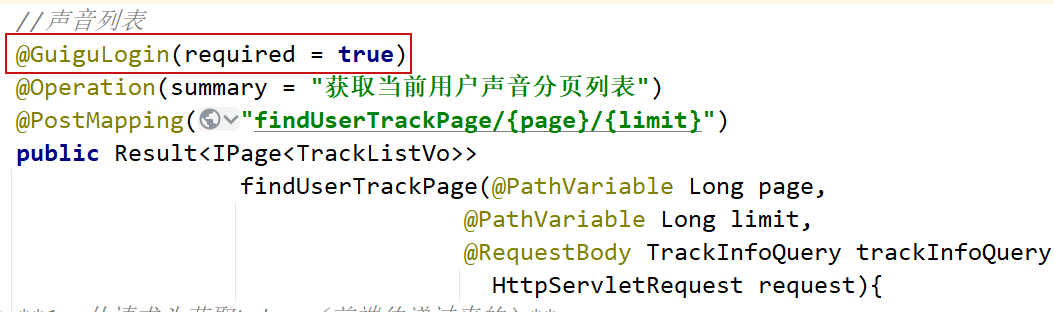
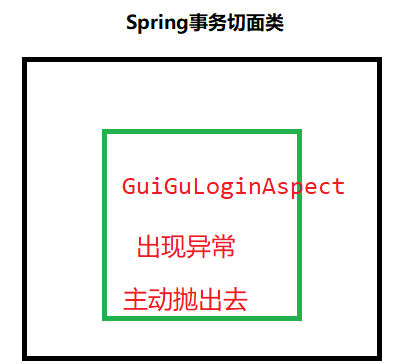
切面类问题
- 如果在一个项目中,创建多个切面类,内部切面类异常,在外部不能感知到
- 多个切面类,内部切面类异常需要手动抛出去,否则外部无法感知到

3、实现用户登录
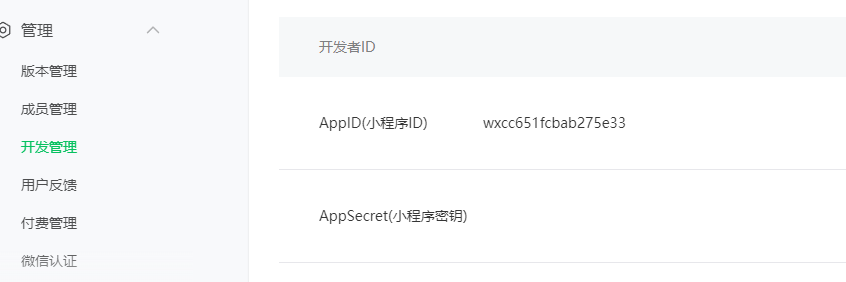
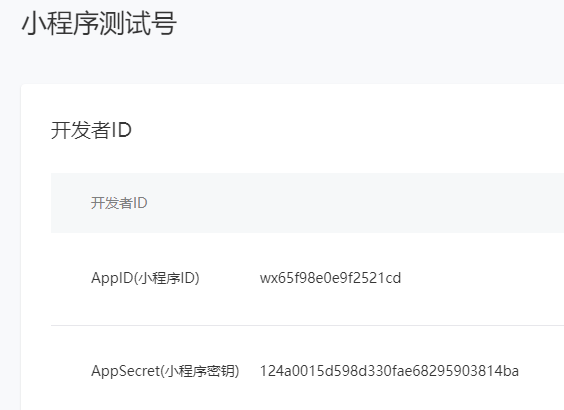
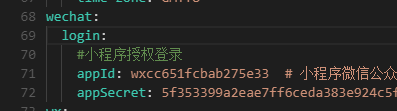
准备两个值
登录接口
配置文件添加值
准备工具类
读取配置文件中值,对微信封装对象进行初始化
1
2
3
4
5
6
7
8
9
| @Data
@Component
@ConfigurationProperties(prefix = "wechat.login")
public class WechatAccountConfig {
private String appId;
private String appSecret;
}
|
1
2
3
4
5
6
7
8
9
10
11
12
13
14
15
16
17
18
19
20
21
| @Component
public class WeChatMpConfig {
@Autowired
private WechatAccountConfig wechatAccountConfig;
@Bean
public WxMaService wxMaService(){
WxMaDefaultConfigImpl wxMaConfig = new WxMaDefaultConfigImpl();
wxMaConfig.setAppid(wechatAccountConfig.getAppId());
wxMaConfig.setSecret(wechatAccountConfig.getAppSecret());
wxMaConfig.setMsgDataFormat("JSON");
WxMaService service = new WxMaServiceImpl();
service.setWxMaConfig(wxMaConfig);
return service;
}
}
|
WxLoginApiController
1
2
3
4
5
6
7
8
9
10
11
12
13
14
15
16
17
18
19
20
21
22
23
24
25
26
27
28
29
30
31
32
33
34
35
36
37
38
39
40
41
42
43
44
45
46
47
48
49
50
51
52
53
54
55
56
57
58
59
60
61
62
63
64
65
66
67
68
69
70
71
72
73
74
75
76
77
78
79
80
81
82
83
84
85
86
87
88
| package com.atguigu.tingshu.user.api;
import cn.binarywang.wx.miniapp.api.WxMaService;
import cn.binarywang.wx.miniapp.bean.WxMaJscode2SessionResult;
import com.atguigu.tingshu.common.rabbit.constant.MqConst;
import com.atguigu.tingshu.common.rabbit.service.RabbitService;
import com.atguigu.tingshu.common.result.Result;
import com.atguigu.tingshu.model.user.UserInfo;
import com.atguigu.tingshu.user.service.UserInfoService;
import com.baomidou.mybatisplus.core.conditions.query.LambdaQueryWrapper;
import io.swagger.v3.oas.annotations.tags.Tag;
import lombok.extern.slf4j.Slf4j;
import me.chanjar.weixin.common.error.WxErrorException;
import org.springframework.beans.factory.annotation.Autowired;
import org.springframework.data.redis.core.RedisTemplate;
import org.springframework.web.bind.annotation.*;
import java.io.IOException;
import java.util.HashMap;
import java.util.UUID;
import java.util.concurrent.TimeUnit;
@Tag(name = "微信授权登录接口")
@RestController
@RequestMapping("/api/user/wxLogin")
@Slf4j
public class WxLoginApiController {
@Autowired
private UserInfoService userInfoService;
@Autowired
private WxMaService wxMaService;
@Autowired
private RedisTemplate redisTemplate;
@Autowired
private RabbitService rabbitService;
@GetMapping("/wxLogin/{code}")
public Result wxLogin(@PathVariable("code") String code) throws WxErrorException {
WxMaJscode2SessionResult sessionInfo =
wxMaService.getUserService().getSessionInfo(code);
String openid = sessionInfo.getOpenid();
LambdaQueryWrapper<UserInfo> wrapper = new LambdaQueryWrapper<>();
wrapper.eq(UserInfo::getWxOpenId,openid);
UserInfo userInfo = userInfoService.getOne(wrapper);
if (userInfo == null) {
userInfo = new UserInfo();
userInfo.setNickname("听友"+System.currentTimeMillis());
userInfo.setAvatarUrl("https://oss.aliyuncs.com/aliyun_id_photo_bucket/default_handsome.jpg");
userInfo.setWxOpenId(openid);
userInfoService.save(userInfo);
rabbitService.sendMessage(MqConst.EXCHANGE_USER,
MqConst.ROUTING_USER_REGISTER,
userInfo.getId());
}
String token = UUID.randomUUID().toString()
.replaceAll("-","");
redisTemplate.opsForValue().set(token,
userInfo,
30, TimeUnit.MINUTES);
HashMap<String, Object> map = new HashMap<>();
map.put("token",token);
return Result.ok(map);
}
}
|
MQ消息接收端
- 在service-account模块编写接收端,获取发送过来userId,初始化账户信息
1
2
3
4
5
6
7
8
9
10
11
12
13
14
15
16
17
18
19
20
| @Component
public class AccountReceiver {
@Autowired
private UserAccountService userAccountService;
@SneakyThrows
@RabbitListener(bindings = @QueueBinding(
exchange = @Exchange(value = MqConst.EXCHANGE_USER, durable = "true"),
value = @Queue(value = MqConst.QUEUE_USER_REGISTER, durable = "true"),
key = {MqConst.ROUTING_USER_REGISTER}
))
public void receive(Long userId, Message message, Channel channel) {
if(userId != null) {
userAccountService.initUserAccount(userId);
}
channel.basicAck(message.getMessageProperties().getDeliveryTag(),false);
}
}
|
总结
登录问题总结
1、登录实现流程(图里面流程)
2、登录实现过程中使用的技术
- **RabbitMQ:**第一次登录,使用RabbitMQ异步初始化账户余额
- **Redis:**通过Redis存储token数据,Redis的key是token,value是用户信息,设置过期时间
- **Cookie(localStorage):**因为cookie默认不能跨域传递的,每次发送请求时候,把cookie值放到请求头里面进行传递
- 自定义注解
- AOP
3、有亮点地方
4、遇到问题
- 多个切面类,内部切面类异常主动抛出去,否则外部不知道的